Reversing an (EOL) action camera USB SCSI Direct Access
Reverse Engineering the USB communication of the ACTIONPRO X7
Introduction
The ACTIONPRO X7 is an action camera which was produced by/for CI IMAGEWEAR activSport GmBH. The camera runs an embedded Linux (but this post is not about GPL violations), and can communicate via WiFi with a remote controller or even be an access point to provide an web interface or act as an interface for a mobile application.

To configure the access point you will need a Windows program, which requires you to install the Microsoft Visual Studio Redistributable 2008 release. Without this software you cannot change the access point settings if you have forgotten the password.
So the camera is eol’d by the manufacturer, the software is hard to get by and there is no way to easily configure the access point using Linux.
The setup
Getting the software/firmware/and more
The best source for finding old software is Archive.org. To get a nice overview of the files cached and still accessible is tabular view.
Files of interests are:
http://www.actionpro.de/download/Action_Manager_v1.3.zip(dead)
With Archive.org we have access to the Windows program Action Manager. Which I could do my research with.
For the analysis I used my Windows virtual machine (VM) with my favorite reversing and debugging tools. Because I am going to install some software I won’t need anymore after I am finish, so I take a VM snapshot before installing anything new.
As mentioned earlier I also needed to install a vc_redist.exe version back from 2008. With all setup the
Action Manager will run.
Tools harmed in the process:
- IDA Pro
- Ghidra
- x64dbg
- XN Resource Viewer
- Wireshark
- Zim Desktop Wiki (Notes taking, while reversing and debugging)
Reversing Engineering
Familiarize with the Software
If the camera is plugged in and powered on, it will switch into USB transfer mode and the contents of the SD card in the camera is shown in the GUI. The camera display will show an USB logo and the text “USB Ready!”.
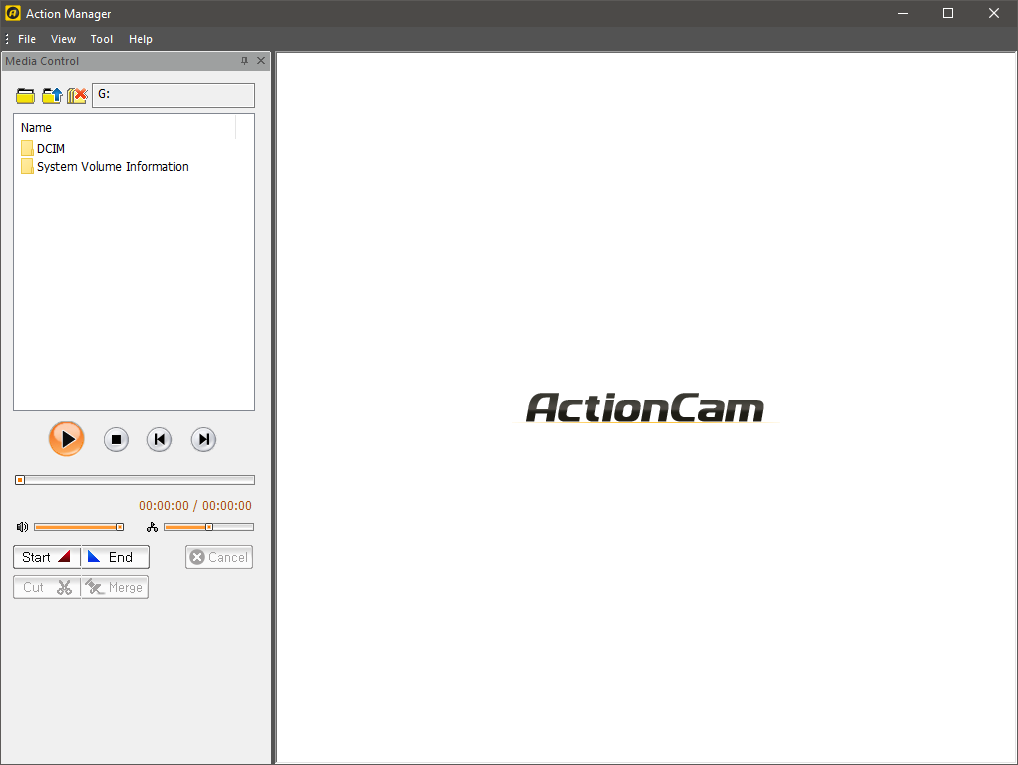
Under the menu “Tool” are the two options “Time Sync” and “Set SSID”.
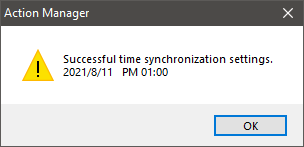
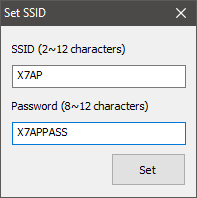
Selecting “Time Sync” will set the camera time to match the system time. With “Set SSID” will bring up a dialog with two edit fields for the “SSID” and the “Password” to secure the access point with.
These are the two actions I am interested in and will by the starting point.
Locating interesting functions with Ghidra or IDA Pro
Both, Ghidra and IDA Pro, can generate a list of strings found in the binary file Action Manager.exe.
In the previous section I looked at all the different actions the program can do. As results I have a few possible strings to look for.
Strings of interests:
- “Successful time synchronization settings.”
- “SSID (2~12 characters)”
- “Password (8~12 characters)”
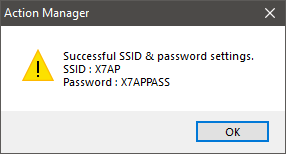
- “Successful SSID & password settings.”
My main goal is to change the AP settings and so I focused on the last strings of the above list.
                     u_Successful_SSID_&_password_setti_00415298
                                                          XREF[1]:     FUN_00406560:004066c5(*)
00415298 53 00 75        unicode    u"Successful SSID & password settings.\nSSID : %s
         00 63 00
         63 00 65
The string is found with only one cross reference of a function accessing this string. As the message reads, the settings have been already updated at this point, which means I have to do a little bit of back tracing and looking for functions that actually access the camera in some way to modify its configuration.
When jumping back to the instruction from where the string is referenced, I noticed two function calls. Which
I later renamed re_SetAP_SSID and re_SetAP_Password.
The binary itself is build with the Microsoft Foundation Class (MFC). Many parts of the GUI is defined in
the resource section (.rsrc) of the binary as Dialog-Resource or Menu-Resource. This means, opening
the binary in a resource viewer, I can find information about text edit fields and how they are referenced.
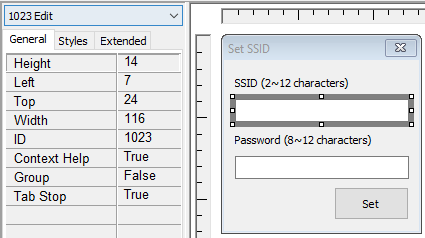
In the screenshot I have selected the edit field for the SSID. The left side information shows its ID which
is used to access the resource during runtime. To access an dialog resource the function GetDlgItemTextW()
is called.
UINT GetDlgItemTextW(
  HWND   hDlg,
  int    nIDDlgItem,
  LPWSTR lpString,
  int    cchMax
);
The most interesting parameter is nIDDlgItem which references an element of a dialog. To see if
something is happening to the text I am interested in, checking the for more instructions earlier will
reveal, that the resource ID 0x3ff (1023) is accessed.
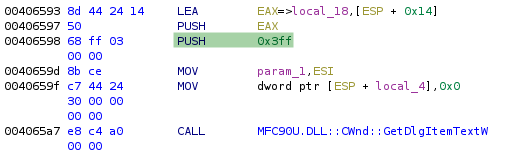
In the same function we are looking at, is a call GetDlgItemTextW() to access the edit field 0x400
(1024) which contains the entered password.
I now have the location where the new SSID and password are inputted and where the configuration succeeded. In between those code blocks should be the call where the information is actually copied to the camera.
After a bit of digging, I found four more function calls. Two of them are to verify the SSID and password
have the correct length (between 2 and 12 characters) and do not contain certain characters. So after I
had identified the purpose I named them re_checkValidSSID() and re_checkValidPassword(). The functions
itself are not very interesting at the moment. The only thing which is noticeable here, is the 12 character
maximum length of the user input, but soon more.
The other two functions are using the SSID and password entered and store them in data structure, which is than given to a other function. Looking at this specific function I found two important Windows function calls.
The first function is CreateFileW to create, but also to open files.
HANDLE CreateFileW(
  LPCWSTR               lpFileName,
  DWORD                 dwDesiredAccess,
  DWORD                 dwShareMode,
  LPSECURITY_ATTRIBUTES lpSecurityAttributes,
  DWORD                 dwCreationDisposition,
  DWORD                 dwFlagsAndAttributes,
  HANDLE                hTemplateFile
);
The argument lpFileName is the file accessed, but CreateFileW() can also be used to open devices. With
Windows it is also possible to access the raw device or drive with this function. After I connected the
camera, Windows also assigned a drive to to access the SD card. In my case the drive E: was used.
To access the raw device CreateFileW() is called with lpFileName = "\\\\.\\E:" (the backslashes are
escaped).
0040f6e7 8b 54 24 18     MOV        EDX,dword ptr [ESP + local_10]      # lpFileName
0040f6eb 83 c4 0c        ADD        ESP,0xc
0040f6ee 6a 00           PUSH       0x0                                 # hTemplateFile
0040f6f0 6a 00           PUSH       0x0                                 # dwFlagsAndAttributes
0040f6f2 6a 03           PUSH       0x3                                 # dwCreationDisposition
0040f6f4 6a 00           PUSH       0x0                                 # lpSecurityAttributes
0040f6f6 6a 03           PUSH       0x3                                 # dwShareMode
0040f6f8 68 00 00        PUSH       0xc0000000                          # dwDesiredAccess
         00 c0
0040f6fd 52              PUSH       EDX                                 # lpFileName
0040f6fe ff 15 f0        CALL       dword ptr [->KERNEL32.DLL::CreateFileW]
         30 41 00
The second noticeable argument is dwDesiredAccess = 0xc0000000, which will grant generic read/write
access1 to the file or device. With the handle returned by CreateFileW() and the buffer prepared
in the calling function is than used to call DeviceIoControl().
A Red Herring
DeviceIoControl() is defined as “Sends a control code directly to a specified device driver, causing
the corresponding device to perform the corresponding operation.”.
BOOL DeviceIoControl(
  HANDLE       hDevice,
  DWORD        dwIoControlCode,
  LPVOID       lpInBuffer,
  DWORD        nInBufferSize,
  LPVOID       lpOutBuffer,
  DWORD        nOutBufferSize,
  LPDWORD      lpBytesReturned,
  LPOVERLAPPED lpOverlapped
);
When DeviceIoControl() is called the handle returned by CreateFileW() is used as parameter hDevice.
A tool like Process Explorer or anything that can show the file handles created by a process, this
handle would show up there. In the following example the device handle is hDevice = 0x654.
An exemplary call to the function from the Action Manager could be:
DeviceIoControl(0x654, 0x4D004, *0xEEF19C, 0x10050, *0xEEF19C, 0x50, *0xEEF16C).
Calling DeviceIoControl() with these parameters, especially dwIoControlCode = 0x4D004, an
IOCTL_SCSI_PASS_THROUGH2 is made. This allows the callee to send almost any SCSI command to the
device. The raw value to this flag is hidden behind compiler macros and bit shifting operations.
The buffers (lpInBuffer/lpOutBuffer) have reserved 0x10050 (65616) bytes and contains mostly
zeros but at the beginning, either:
00000000: 2c00 0000 0000 1000 0100 0000 0000 0000  ,...............
00000010: a086 0100 5000 0000 0000 0000 fd00 5837  ....P.........X7
00000020: 4150 0000 0000 0000 0000 0000 0000 0000  AP..............
[shortend for reading pleasure]
or slightly different contents when updating the password. For the password the buffer is different
at offset 0x1c, which than would be 0xfe and the “X7APP` would be the password string.
The buffer is used as input source, with data to be written to the device, as well as the output buffer to store the answer of the device.
More information on how I resolved 0x4D004 into IOCTL_SCSI_PASS_THROUGH is in
Appendix: IOCTL_SCSI_PASS_THROUGH.
The SSID or password buffer will be written to the device.
Here was my red herring, at least I focused so hard that I have missed the obvious. Because I though, I
have to implement a IOCTL_SCSI_PASS_THROUGH on Linux using ioctl()3. After some research I
came across some examples, but nothing worked. The solution was libusb.
What actually happened. When writing to the device and the storage interface we still need to talk USB. And luckily it is super easy to capture USB traffic using virtual machines.
USB Packet Capture
The first step is to identify the bus the camera is connected to. I am working with Linux as host
for my virtual machines, so running a lsusb will return a list of all USB devices and the one I am
looking for.
Bus 005 Device 017: ID 4255:1000 GoPro 9FF2 [Digital Photo Display]
The camera is therefore connected to bus 5 and listed as device 17.
I also need to load the usbmon kernel module, which will provide an interface for each USB bus.
With almost everything prepared, I can start Wireshark now and select the usbmon5 interface as
capture device. The monitoring devices are numbered the same as their bus they are listening on.
For me it’s the easiest to run all actions I want to observe multiple times in a row, to make them stand out more in the generic traffic.
Little side note here: unfortunately it is not possible to apply pcap filters to USB captures. But fortunately display filters work like a charm.
Applying the filter usb.device_address == 17 narrows the packets down to the ones sent by the
camera. USB is very noisy from time to time, so it is to be expected a lot of BULK In/Out
packets. But with Wireshark being Wireshark I could just do a text search and see, if there
is at least one packet with the SSID string “X7AP”.
And Wireshark still being Wireshark it comes with a dissector for USB packets, which helped me in reassembling the actual communication in order to set the SSID, after I located the first valid packet.

The packets I was most interested in are the “SCSI” messages of type USBMS, which stands
for “USB Media Storage”.
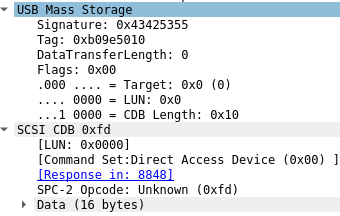
When looking closely at the “SCSI Command: 0xfd LUN:0x00” packet, the 0xfd as opcode stands
out. The 0xfd was part of the buffer which was used with DeviceIoControl(). Also the actual
transferred size is down to 16 bytes.
0000 fd 00 58 37 41 50 00 00 00 00 00 00 00 00 00 00 ..X7AP..........
This means I need a way to send these 16 bytes to set the SSID to “X7AP” or later to anything else.
Hacking Time
Writing a Proof of Concept
After wasting a lot of time in writing different version using ioctl(), I moved to
libusb which is indeed an easy to use library for doing all sorts
of USB shenanigans.
The first tries were not very promising as well, but looking through the
examples provided by the libusb project,
the most promising file is xusb.c.
To be honest, I never compiled xusb.c to see what it actually does, but what I know it is
supposed to do, is sending mass storage commands.
The function send_mass_storage_command() will take an USB device handle, the endpoint, a
LUN, buffer named cdb and a few more arguments. The name cdb was previously mentioned
as part of the “SCSI Command: 0xfd`.
I copied parts of the code provided by xusb.c with some modifications. I will upload the
code soon and update the text afterwards. Listing everything here would be simply to much
and too boring.
Opening the USB device is a straight forward process with libusb. I opened the device
with libusb_open_device_with_vid_pid() which will return a handle to the device. The only
thing I need to specify is the vendor (0x4255) and product (0x1000) id, which can be found
with lsusb.
In the steps, the device needs to be configured, by selecting an configuration provided by the USB itself, and to claim the device, or taking it away from a kernel driver.
After having the basic device setup ready, I used the code provided by xusb.c and modified
the cdb buffer which is send by send_mass_storage_command(). To do so I looked at each
packet being a USBMS “SCSI” message.
For the next part the data sheet for SCSI Primary Commands4 helped by understanding what is sent to device.
The first message we need to reproduce is “SPC-2 Opcode: Request Sense (0x03)”. I also added a comment before the actual call with the corresponding Wireshark packet description.
memset(cdb, 0, sizeof(cdb));
cdb[0] = 0x03;  // see chapter 7.20.1 SCSI Primary Commands datasheet (SPC-2)
cdb[4] = REQUEST_SENSE_LENGTH;

// host	        5.17.1	USBMS	95	SCSI: Request Sense LUN: 0x00
send_mass_storage_command(handle, 0x01, 0, cdb, LIBUSB_ENDPOINT_IN, REQUEST_SENSE_LENGTH, &expected_tag);

// 5.17.1	host	USBMS	82	SCSI: Data In LUN: 0x00 (Request Sense Response Data)
rc = libusb_bulk_transfer(handle, 0x81, (unsigned char*)&sense, REQUEST_SENSE_LENGTH, &size, 1000);
It is also important to read the reply by the device, otherwise the next write commands will timeout.
According to the Wireshark dump I am expecting a second message to be read.
// 5.17.1	host	USBMS	77	SCSI: Response LUN: 0x00 (Request Sense) (Good)
rc = libusb_bulk_transfer(handle, 0x81, (unsigned char*)&sense, REQUEST_SENSE_LENGTH, &size, 1000);
Last but not least, the message I have been waiting patiently to write. This would the set cameras SSID to “888888888”.
memset(cdb, 0, sizeof(cdb));
cdb[0] = 0x03;  // see chapter 7.20.1 SCSI Primary Commands datasheet (SPC-2)
cdb[4] = REQUEST_SENSE_LENGTH;

unsigned char cmd[] = "\xfd\x00\x38\x38\x38\x38\x38\x38\x38\x38\x38\x38\x00\x00\x00\x00";

// host	    5.17.1	USBMS	95	SCSI Command: 0xfd LUN:0x00
send_mass_storage_command(handle, 0x01, 0, cmd, LIBUSB_ENDPOINT_IN, REQUEST_SENSE_LENGTH, &expected_tag);
rc = libusb_bulk_transfer(handle, 0x81, (unsigned char*)&sense, REQUEST_SENSE_LENGTH, &size, 1000);
What supposed to happen is, I write a vendor specific command 0xfd to the device and the device
should react accordingly and set the SSID. The first time I ran the code, I encountered an
error message: “send_mass_storage_command: don’t know how to handle this command (FD, length 0)”.
The answer to this problem lies in the the definition of static const uint8_t cdb_length[256].
This array defines the required allocation length for each opcode.
static const uint8_t cdb_length[256] = {
  // 0  1  2  3  4  5  6  7  8  9  A  B  C  D  E  F
    06,06,06,06,06,06,06,06,06,06,06,06,06,06,06,06,  //  0
    06,06,06,06,06,06,06,06,06,06,06,06,06,06,06,06,  //  1
    10,10,10,10,10,10,10,10,10,10,10,10,10,10,10,10,  //  2
    10,10,10,10,10,10,10,10,10,10,10,10,10,10,10,10,  //  3
    10,10,10,10,10,10,10,10,10,10,10,10,10,10,10,10,  //  4
    10,10,10,10,10,10,10,10,10,10,10,10,10,10,10,10,  //  5
    00,00,00,00,00,00,00,00,00,00,00,00,00,00,00,00,  //  6
    00,00,00,00,00,00,00,00,00,00,00,00,00,00,00,00,  //  7
    16,16,16,16,16,16,16,16,16,16,16,16,16,16,16,16,  //  8
    16,16,16,16,16,16,16,16,16,16,16,16,16,16,16,16,  //  9
    12,12,12,12,12,12,12,12,12,12,12,12,12,12,12,12,  //  A
    12,12,12,12,12,12,12,12,12,12,12,12,12,12,12,12,  //  B
    00,00,00,00,00,00,00,00,00,00,00,00,00,00,00,00,  //  C
    00,00,00,00,00,00,00,00,00,00,00,00,00,00,00,00,  //  D
    00,00,00,00,00,00,00,00,00,00,00,00,00,00,00,00,  //  E
    00,00,00,00,00,00,00,00,00,00,00,00,00,00,00,00,  //  F
};
After all the work I have done, I knew the only three opcodes supported by the camera are:
0xfd: set AP SSID0xfe: set AP passphrase0xff: synchronize time
and all packets were 16 bytes, which lead me to update the last line of the array to:
00,00,00,00,00,00,00,00,00,00,00,00,00,16,16,16, // F
With these changes I am prepared to write not only the SSID, but also the password and in the near future the time.
That’s it, after I have specified the size required for the command the proof of concept ran, and after a power cycle the access point of the camera was named: “888888888”.
As promised the actual full program source code will follow. I just finished this project
and needed to write everything down.
The finished project can be found downloaded here:
- Primar: GitHub repository.
- Mirror: Gitea repository.
Future Projects
The camera has also a remote control, which I like to look into. I don’t expect an Linux there. The Linux of the camera might be interesting to look at as well. The scripts setting the SSID and password are mostly simple shell scripts, which makes it obvious why certain characters are not covered, but this and what characters are “forbidden” by the GUI will be covered next time.
The main goal for now, turning everything into a nice clean program and to set the camera time.
Changelog
| Date | Change description |
|---|---|
| 2021-08-11 | Inital publication |
| 2021-08-12 | Added link to github repository |
| 2021-08-30 | Added Git mirror to git.goatpr0n.de |
Appendix
IOCTL_SCSI_PASS_THROUGH
These information are gathered by digging through the Windows SDK header files:
#define FILE_DEVICE_CONTROLLER 	0x00000004
#define IOCTL_SCSI_BASE                 FILE_DEVICE_CONTROLLER

#define CTL_CODE( DeviceType, Function, Method, Access ) (                 \
	((DeviceType) << 16) | ((Access) << 14) | ((Function) << 2) | (Method) \
)

#define METHOD_BUFFERED                 0
#define FILE_READ_ACCESS          ( 0x0001 )    // file & pipe
#define FILE_WRITE_ACCESS         ( 0x0002 )    // file & pipe

#define IOCTL_SCSI_PASS_THROUGH         CTL_CODE(IOCTL_SCSI_BASE, 0x0401, METHOD_BUFFERED, FILE_READ_ACCESS | FILE_WRITE_ACCESS)
Target: dwIoControlCode 0x4d004:
0x00000004 << 16 | ((0x0002 | 0x0001) << 14) | 0x0401 << 2 | 0